Work in progress
The content of this page was not yet updated for Godot
4.2
and may be outdated. If you know how to improve this page or you can confirm
that it's up to date, feel free to open a pull request.
Score et rejouer
Dans cette partie, nous ajouterons le score, la lecture de la musique et la possibilité de redémarrer le jeu.
Nous devons garder la trace du score actuel dans une variable et l'afficher à l'écran en utilisant une interface minimale. Nous allons utiliser une étiquette de texte pour ce faire.
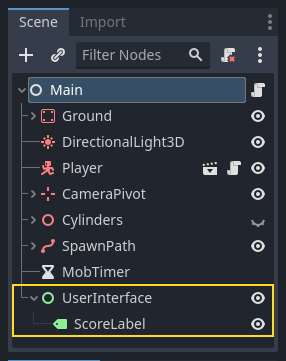
In the main scene, add a new child node Control to Main and name it
UserInterface. You will automatically be taken to the 2D screen, where you can
edit your User Interface (UI).
Add a Label node and name it ScoreLabel
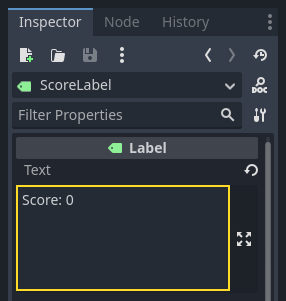
Dans l'Inspecteur, définissez le Text du Label avec un texte générique tel que "Score : 0".
En outre, le texte est blanc par défaut, comme l'arrière-plan de notre jeu. Nous devons changer sa couleur pour le voir au moment de l'exécution.
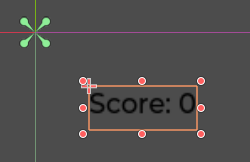
Scroll down to Theme Overrides, and expand Colors and enable Font Color in order to tint the text to black (which contrasts well with the white 3D scene)

Enfin, cliquez et faites glisser le texte dans la fenêtre d'affichage pour l'éloigner du coin supérieur gauche.
The UserInterface node allows us to group our UI in a branch of the scene tree
and use a theme resource that will propagate to all its children. We'll use it
to set our game's font.
Création d'un thème d'interface utilisateur
Once again, select the UserInterface node. In the Inspector, create a new
theme resource in Theme -> Theme.

Cliquez dessus pour ouvrir l'éditeur de thème dans le panneau inférieur. Il vous donne un aperçu de l'apparence de tous les widgets intégrés à l'interface utilisateur avec votre ressources de thème.

Par défaut, un thème ne possède qu'une seule propriété, la Default Font.
Voir aussi
Vous pouvez ajouter d'autres propriétés à la ressource de thème pour concevoir des interfaces utilisateur complexes, mais cela dépasse le cadre de cette série. Pour en savoir plus sur la création et l'édition de thèmes, consultez Introduction à l'habillage des interfaces graphiques.
Celui-ci attend un fichier de police comme ceux que vous avez sur votre ordinateur. Deux formats de fichiers de police communs sont TrueType Font (TTF) et OpenType Font (OTF).
In the FileSystem dock, expand the fonts directory and click and drag the
Montserrat-Medium.ttf file we included in the project onto the Default Font.
The text will reappear in the theme preview.
The text is a bit small. Set the Default Font Size to 22 pixels to increase the text's size.

Garder une trace du score
Let's work on the score next. Attach a new script to the ScoreLabel and define
the score variable.
extends Label

var score = 0
using Godot;

public partial class ScoreLabel : Label
{
    private int _score = 0;
}
The score should increase by 1 every time we squash a monster. We can use
their squashed signal to know when that happens. However, because we instantiate
monsters from the code, we cannot connect the mob signal to the ScoreLabel via the editor.
Au lieu de cela, nous devons établir la connexion depuis le code à chaque fois que nous créons un monstre.
Open the script main.gd. If it's still open, you can click on its name in
the script editor's left column.

Alternatively, you can double-click the main.gd file in the FileSystem
dock.
Au bas de la fonction _on_MobTimer_timeout(), ajoutez la ligne suivante :
func _on_mob_timer_timeout():
    #...
    # We connect the mob to the score label to update the score upon squashing one.
    mob.squashed.connect($UserInterface/ScoreLabel._on_mob_squashed.bind())
private void OnMobTimerTimeout()
{
    // ...
    // We connect the mob to the score label to update the score upon squashing one.
    mob.Squashed += GetNode<ScoreLabel>("UserInterface/ScoreLabel").OnMobSquashed;
}
This line means that when the mob emits the squashed signal, the
ScoreLabel node will receive it and call the function _on_mob_squashed().
Head back to the ScoreLabel.gd script to define the _on_mob_squashed()
callback function.
Là, nous incrémentons le score et mettons à jour le texte affiché.
func _on_mob_squashed():
    score += 1
    text = "Score: %s" % score
public void OnMobSquashed()
{
    _score += 1;
    Text = $"Score: {_score}";
}
The second line uses the value of the score variable to replace the
placeholder %s. When using this feature, Godot automatically converts values
to string text, which is convenient when outputting text in labels or
when using the print() function.
Voir aussi
You can learn more about string formatting here: Chaînes de format GDScript. In C#, consider using string interpolation with "$".
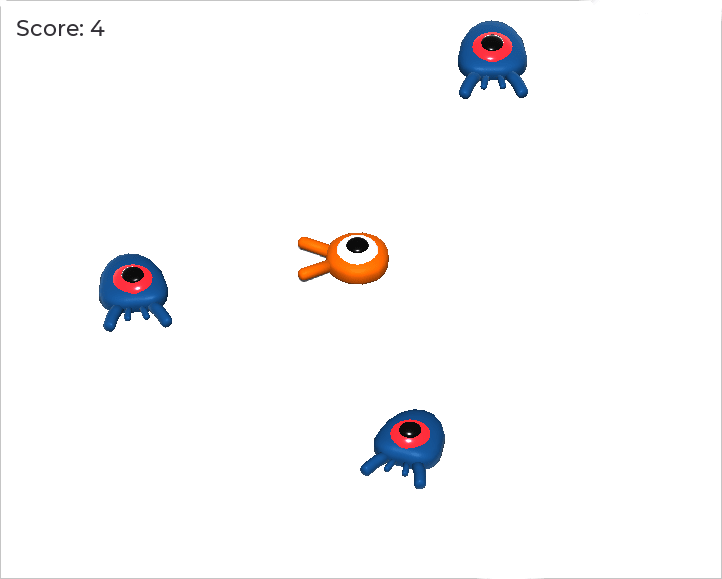
Vous pouvez maintenant jouer le jeu et écraser quelques ennemis pour voir le score augmenter.
Note
Dans un jeu complexe, vous voudrez peut-être séparer complètement votre interface utilisateur de l'univers du jeu. Dans ce cas, vous ne garderez pas trace du score sur l'étiquette. Au lieu de cela, vous voudrez peut-être le stocker dans un objet distinct et dédié. Mais pour le prototypage ou lorsque votre projet est simple, il est bon de garder votre code simple. La programmation est toujours un exercice d'équilibre.
Réessayer le jeu
Nous allons maintenant ajouter la possibilité de rejouer après être mort. Lorsque le joueur meurt, nous affichons un message à l'écran et nous attendons une entrée.
Head back to the main.tscn scene, select the UserInterface node, add a
child node ColorRect, and name it Retry. This node fills a
rectangle with a uniform color and will serve as an overlay to darken the
screen.
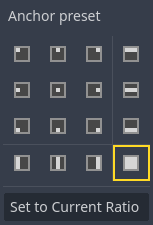
To make it span over the whole viewport, you can use the Anchor Preset menu in the toolbar.

Ouvrez-le et appliquez la commande Full Rect.
Nothing happens. Well, almost nothing; only the four green pins move to the corners of the selection box.

This is because UI nodes (all the ones with a green icon) work with anchors and
margins relative to their parent's bounding box. Here, the UserInterface node
has a small size and the Retry one is limited by it.
Select the UserInterface and apply Anchor Preset -> Full Rect to it as well. The
Retry node should now span the whole viewport.
Let's change its color so it darkens the game area. Select Retry and in the
Inspector, set its Color to something both dark and transparent. To do so,
in the color picker, drag the A slider to the left. It controls the color's
Alpha channel, that is to say, its opacity/transparency.

Next, add a Label as a child of Retry and give it the Text
"Press Enter to retry."
To move it and anchor it in the center of the screen, apply Anchor Preset -> Center
to it.

Coder l'option réessayer
We can now head to the code to show and hide the Retry node when the player
dies and plays again.
Open the script main.gd. First, we want to hide the overlay at the start of
the game. Add this line to the _ready() function.
func _ready():
    $UserInterface/Retry.hide()
public override void _Ready()
{
    GetNode<Control>("UserInterface/Retry").Hide();
}
Ensuite, quand le joueur est touché, nous montrons la surimpression.
func _on_player_hit():
    #...
    $UserInterface/Retry.show()
private void OnPlayerHit()
{
    //...
    GetNode<Control>("UserInterface/Retry").Show();
}
Finally, when the Retry node is visible, we need to listen to the player's
input and restart the game if they press enter. To do this, we use the built-in
_unhandled_input() callback, which is triggered on any input.
If the player pressed the predefined ui_accept input action and Retry is
visible, we reload the current scene.
func _unhandled_input(event):
    if event.is_action_pressed("ui_accept") and $UserInterface/Retry.visible:
        # This restarts the current scene.
        get_tree().reload_current_scene()
public override void _UnhandledInput(InputEvent @event)
{
    if (@event.IsActionPressed("ui_accept") && GetNode<Control>("UserInterface/Retry").Visible)
    {
        // This restarts the current scene.
        GetTree().ReloadCurrentScene();
    }
}
La fonction get_tree() nous donne accès à l'objet global SceneTree, qui nous permet de recharger et de redémarrer la scène actuelle.
Ajouter de la musique
Pour ajouter une musique qui joue continuellement en arrière-plan, nous allons utiliser une autre fonctionnalité de Godot : autoloads.
To play audio, all you need to do is add an AudioStreamPlayer node to your scene and attach an audio file to it. When you start the scene, it can play automatically. However, when you reload the scene, like we do to play again, the audio nodes are also reset, and the music starts back from the beginning.
Vous pouvez utiliser la fonction autoload pour que Godot charge automatiquement un nœud ou une scène au début du jeu, en dehors de la scène actuelle. Vous pouvez également l'utiliser pour créer des objets accessibles à tous.
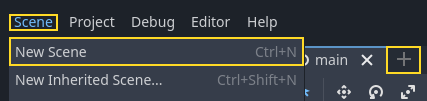
Create a new scene by going to the Scene menu and clicking New Scene or by using the + icon next to your currently opened scene.
Click the Other Node button to create an AudioStreamPlayer and rename it to
MusicPlayer.

Nous avons inclus une bande sonore dans le répertoire art/, House In a Forest Loop.ogg. Cliquez et faites-la glisser sur la propriété Stream dans l'Inspector. Activez également l'option Autoplay pour que la musique soit jouée automatiquement au début du jeu.

Enregistrez la scène sous le nom de MusicPlayer.tscn.
Nous devons l'enregistrer en tant qu'autoload. Allez dans le menu Projet -> Paramètres du projet... et cliquez sur l'onglet Autoload.
Dans le champ Chemin, vous voulez entrer le chemin d'accès à votre scène. Cliquez sur l'icône du dossier pour ouvrir le navigateur de fichiers et double-cliquez sur MusicPlayer.tscn. Ensuite, cliquez sur le bouton Add à droite pour enregistrer le nœud.

MusicPlayer.tscn now loads into any scene you open or play.
So if you run the game now, the music will play automatically in any scene.
Avant de conclure cette leçon, voici un bref aperçu de son fonctionnement. Lorsque vous lancez le jeu, votre dock Scene change pour vous donner deux onglets : Remote et Local.
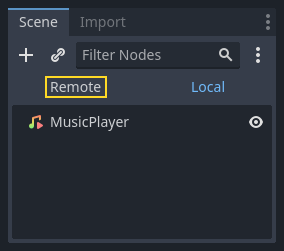
L'onglet Remote vous permet de visualiser l'arbre de nœuds de votre jeu en cours. Vous y verrez le nœud Main et tout ce que la scène contient ainsi que les mobs instanciés en bas.
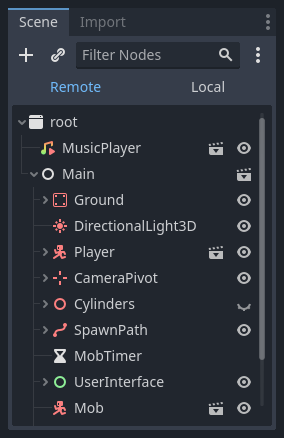
At the top are the autoloaded MusicPlayer and a root node, which is your
game's viewport.
Et c'est tout pour cette leçon. Dans la prochaine partie, nous ajouterons une animation pour rendre le jeu plus agréable à regarder et à toucher.
Here is the complete main.gd script for reference.
extends Node

@export var mob_scene: PackedScene

func _ready():
    $UserInterface/Retry.hide()


func _on_mob_timer_timeout():
    # Create a new instance of the Mob scene.
    var mob = mob_scene.instantiate()

    # Choose a random location on the SpawnPath.
    # We store the reference to the SpawnLocation node.
    var mob_spawn_location = get_node("SpawnPath/SpawnLocation")
    # And give it a random offset.
    mob_spawn_location.progress_ratio = randf()

    var player_position = $Player.position
    mob.initialize(mob_spawn_location.position, player_position)

    # Spawn the mob by adding it to the Main scene.
    add_child(mob)

    # We connect the mob to the score label to update the score upon squashing one.
    mob.squashed.connect($UserInterface/ScoreLabel._on_mob_squashed.bind())

func _on_player_hit():
    $MobTimer.stop()
    $UserInterface/Retry.show()

func _unhandled_input(event):
    if event.is_action_pressed("ui_accept") and $UserInterface/Retry.visible:
        # This restarts the current scene.
        get_tree().reload_current_scene()
using Godot;

public partial class Main : Node
{
    [Export]
    public PackedScene MobScene { get; set; }

    public override void _Ready()
    {
        GetNode<Control>("UserInterface/Retry").Hide();
    }

    public override void _UnhandledInput(InputEvent @event)
    {
        if (@event.IsActionPressed("ui_accept") && GetNode<Control>("UserInterface/Retry").Visible)
        {
            // This restarts the current scene.
            GetTree().ReloadCurrentScene();
        }
    }

    private void OnMobTimerTimeout()
    {
        // Create a new instance of the Mob scene.
        Mob mob = MobScene.Instantiate<Mob>();

        // Choose a random location on the SpawnPath.
        // We store the reference to the SpawnLocation node.
        var mobSpawnLocation = GetNode<PathFollow3D>("SpawnPath/SpawnLocation");
        // And give it a random offset.
        mobSpawnLocation.ProgressRatio = GD.Randf();

        Vector3 playerPosition = GetNode<Player>("Player").position;
        mob.Initialize(mobSpawnLocation.Position, playerPosition);

        // Spawn the mob by adding it to the Main scene.
        AddChild(mob);

        // We connect the mob to the score label to update the score upon squashing one.
        mob.Squashed += GetNode<ScoreLabel>("UserInterface/ScoreLabel").OnMobSquashed;
    }

    private void OnPlayerHit()
    {
        GetNode<Timer>("MobTimer").Stop();
        GetNode<Control>("UserInterface/Retry").Show();
    }
}