Up to date
This page is up to date for Godot 4.2.
If you still find outdated information, please open an issue.
Création de la scène joueur
Avec les paramètres du projet en place, nous pouvons commencer à travailler sur le personnage contrôlé par le joueur.
La première scène définira l'objet Player. L'un des avantages de la création d'une scène Player séparée est que nous pouvons la tester séparément, avant même d'avoir créé d'autres parties du jeu.
Structure des nœuds
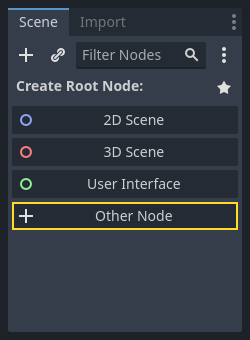
Pour commencer, nous devons choisir un nœud racine pour l'objet joueur. En règle générale, le nœud racine d'une scène doit refléter la fonctionnalité souhaitée de l'objet - ce que l'objet est. Cliquez sur le bouton "Other Node" et ajoutez un nœud Area2D à la scène.
Godot affichera une icône d'avertissement près du nœud dans l'arbre de scène. Vous pouvez l'ignorer pour le moment. Nous y reviendrons plus tard.
Avec Area2D, nous pouvons détecter les objets qui chevauchent ou rentrent en collision le joueur. Changez le nom du nœud en Player en double-cliquant sur son nom. Maintenant que nous avons défini le nœud racine de la scène, nous pouvons ajouter des nœuds supplémentaires pour lui donner plus de fonctionnalités.
Before we add any children to the Player node, we want to make sure we don't
accidentally move or resize them by clicking on them. Select the node and click
the icon to the right of the lock. Its tooltip says "Make selected node's
children not selectable."

Sauvegardez la scène. Cliquez sur Scène -> Enregistrer la scène, ou appuyez sur Ctrl + S sous Windows/Linux ou Cmd + S sous macOS.
Note
Pour ce projet, nous suivrons les conventions de nommage de Godot.
GDScript : Les classes (nœuds) utilisent PascalCase, les variables et les fonctions utilisent snake_case, et les constantes utilisent ALL_CAPS (Voir Guide de style GDScript).
C# : Les classes, les variables d'exportation et les méthodes utilisent PascalCase, les attributs privés utilisent _camelCase, les variables locales et les paramètres utilisent camelCase (Voir Guide de style C#). Attention à taper les noms des méthodes précisément lorsque vous connectez des signaux.
Animation du sprite
Click on the Player node and add (Ctrl + A on Windows/Linux or
Cmd + A on macOS) a child node AnimatedSprite2D. The AnimatedSprite2D will handle the
appearance and animations for our player. Notice that there is a warning symbol
next to the node. An AnimatedSprite2D requires a SpriteFrames resource, which is a list of the animations it can
display. To create one, find the Sprite Frames property under the Animation tab in the Inspector and click
"[empty]" -> "New SpriteFrames". Click again to open the "SpriteFrames" panel:
On the left is a list of animations. Click the "default" one and rename it to
"walk". Then click the "Add Animation" button to create a second animation named
"up". Find the player images in the "FileSystem" tab - they're in the art
folder you unzipped earlier. Drag the two images for each animation, named
playerGrey_up[1/2] and playerGrey_walk[1/2], into the "Animation Frames"
side of the panel for the corresponding animation:
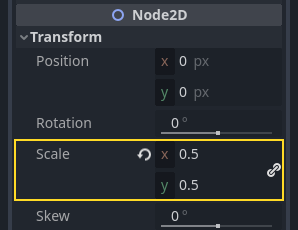
The player images are a bit too large for the game window, so we need to scale
them down. Click on the AnimatedSprite2D node and set the Scale property
to (0.5, 0.5). You can find it in the Inspector under the Node2D
heading.
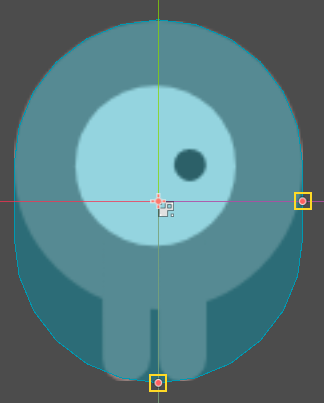
Finally, add a CollisionShape2D as a child of
Player. This will determine the player's "hitbox", or the bounds of its
collision area. For this character, a CapsuleShape2D node gives the best
fit, so next to "Shape" in the Inspector, click "[empty]" -> "New
CapsuleShape2D". Using the two size handles, resize the shape to cover the
sprite:
Lorsque vous avez terminé, votre scène Player devrait ressembler à ceci :
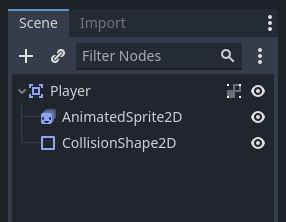
Veillez à sauvegarder à nouveau la scène après ces changements.
Dans la prochaine partie, nous ajouterons un script sur le nœud du joueur pour le déplacer et l'animer. Ensuite, nous mettrons en place une détection de collisions pour savoir quand le joueur a été touché par quelque chose.